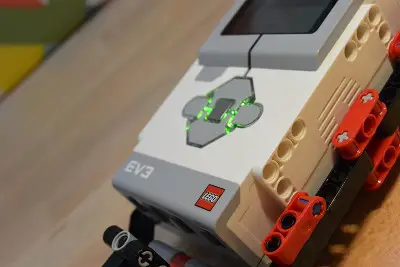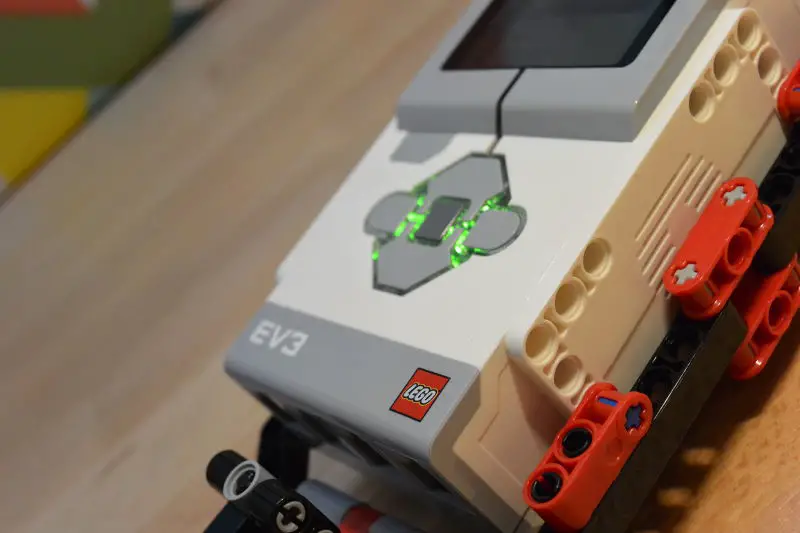
The Lego EV3 Brick lights can be useful when looking for a way to provide feedback from a program or EV3 Robot. In this post we take a detailed look at the EV3 Brick Status Light programming block and guide you through 2 fun example programs which put the Brick Status lights to good use.
The EV3 Brick lights can be accessed from within the Lego Mindstorms Programming software via the Green (action) Brick Status Light block:

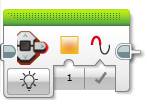
What Colors are Available on the EV3 Brick?
There are 3 colors available on the EV3 Brick:
- Red
- Orange
- Green
Brick Status Light Modes
There are 3 modes available from within the EV3 Brick Status Light programming block:
Off
This mode is fairly self explanatory, it turns the EV3 Brick lights off. There’s no other options for this mode.

On
Turns the EV3 Brick status lights On and there are 2 inputs available for this mode:
- Color: Pick from any of the following:
- Green (0)
- Orange (1) – Default
- Red (2)
- Pulse:
- True: This will pulse the chosen color on the EV3 Brick
- False: This will show a solid color
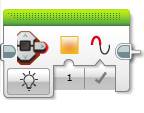
Brick Status Light – On
Reset
The Reset mode will return the EV3 Brick status lights back to their default green pulsing lights to indicate that a program is running.

Brick Status Light – Reset
Example EV3 Brick Status Light Program 1: Display Random Color
For the first example program we will use the touch sensor to generate a random number between 0 and 2 and use that number to display a random solid color using the EV3 Brick status lights.
The program logic will be:
- Turn the EV3 Brick Status lights off
- Wait for the button sensor to be bumped (for more information on the button sensor see our post here)
- When it’s bumped, generate a random number
- Use the random number for the color input of the Brick Status Light block
- Display the color for 5 seconds
- Go back to 1 (start again)
There’s no complicated build required for this example, just plug the Touch sensor into port 1 and follow the steps below:
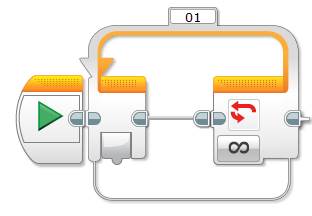
- Create an infinite loop:
- Drag and drop an orange Loop block next to the Start block.
- Leave it’s loop condition as infinite. As an option you could set this to a predefined time (say 60 seconds) to have the program end gracefully).
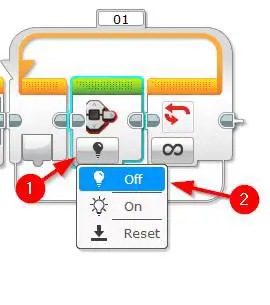
- Turn the Brick Status Lights Off
- Drag and drop a green Brick Status Light block into the Loop
- Set its mode to Off
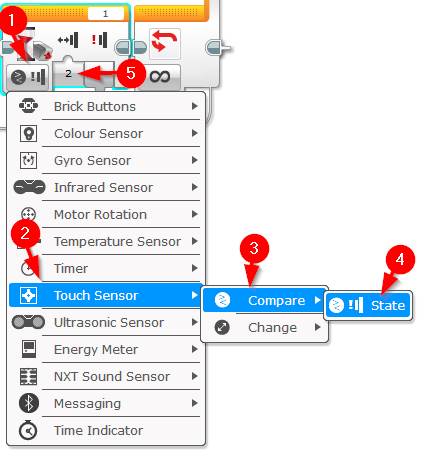
- Wait for the Touch Sensor button to be bumped
- Drag and drop an orange Wait block next to the Brick Status Light block
- Set its mode to Touch Sensor | Compare | State
- Set the State input to 2 (bumped)
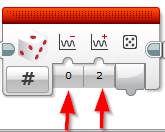
- Generate a random number
- Drag and drop a red Random block next to the Wait block
- Set its mode to Numeric
- Set the lower bound input to 0
- Set the upper bound input to 2
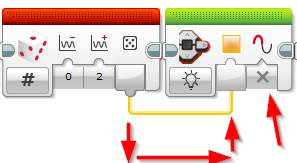
- Show the random number as a EV3 Brick Status light color
- Drag and drop a green Brick Status Light block next to the random block
- Ensure its mode is set to On
- Set Pulse input to False
- Wire the Value output on the Random block into the color input on the Brick Status Light block
- Show the random color for 5 seconds
- Drag and drop an orange Wait block next to the Brick Status light block
- Set its seconds input to 5
That’s it! Press the Download and Play button to test out the program. Once it’s running press the button to generate a random color.
The complete program should look like this:

Example EV3 Brick Status Light Program 2: Bump Competition
For the final example program lets create a game using the Lego EV3 Brick and touch sensor. The aim of the game is to hit the touch sensor button as many times as you can in 20 seconds. We’ll use the EV3 Brick status lights to show your progress during the 20 seconds i.e. the program will change the color of the lights depending on how many bumps the touch sensor has had:
- 0 to 50 bumps of the touch sensor = Red (bad score)
- 51 to 100 bumps of the touch sensor = Orange (Ok score)
- 101 and over bumps of the touch sensor = Greed (good score)
The program will also use the EV3 Brick Display to show the number of bumps achieved on the Touch Sensor within the 20 seconds so that competitors can keep score.
The program logic will be:
- Define a new variable called BumpCount to hold the number of bumps (presses) of the touch sensor
- Give an audible count down from 3 to 1: 3, 2, 1, Go!
- Loop the program for 20 seconds and count the number of bumps on the Touch Sensor.
- Show the number of bumps on the EV3 Brick display
- Depending on the number of bumps, display the appropriate color on the Brick Status Lights (see above for color logic)
- Show the total number of bumps for 5 on the EV3 Brick display for 5 seconds.
There’s no complicated build for this program either, just plug the Touch Sensor into port one and follow the steps below.
Lets get started:
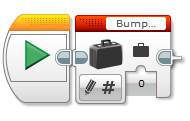
- Create a new Numeric Variable named BumpCount to store the number of bumps on the touch sensor:
- Drag and drop a red Variable block next to the start button
- Set its mode to Write | Numeric
- Click the Variable selector on the top right and select “Add Variable”
- Type “BumpCount” (without the quotes) and click Ok
- Give an audible countdown
- Drag and drop a green Sound block next to the variable block
- Select the sound: LEGO Sound Files | Numbers | Three
- Drag and drop another green Sound block next to the last one
- Select the sound: LEGO Sound Files | Numbers | Two
- Repeat this process for two (2) more green Sound blocks selecting:
- LEGO Sound Files | Numbers | One
- LEGO Sound Files | Communication | Go

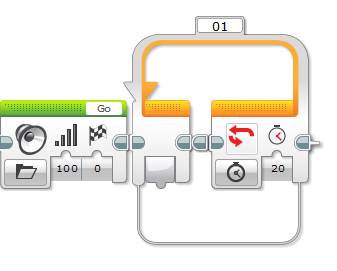
- Run the EV3 program for 20 seconds
- Drag and drop an orange Loop block next to the “Go” sound block
- Set its mode to Time Indicator
- Set the Seconds input to 20
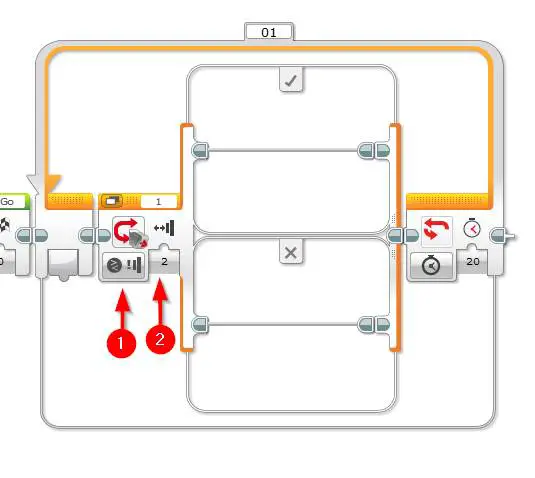
- Wait for the Touch sensor to be bumped
- Drag and drop an orange Switch block inside the loop
- Set its mode to Touch Sensor | Compare | State
- Set the State input to 2
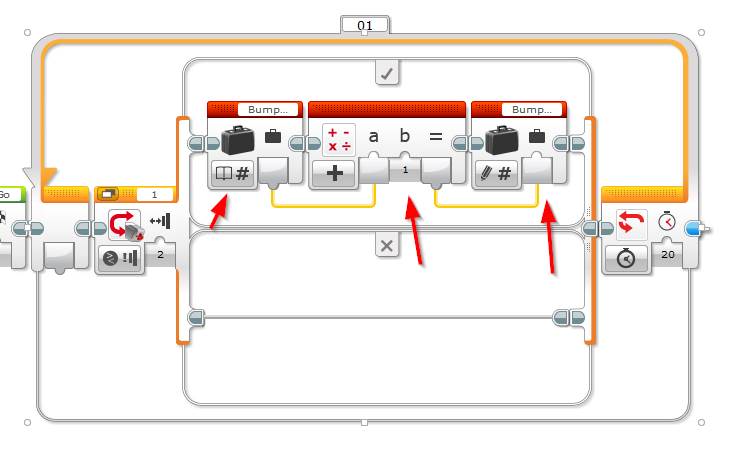
- Add 1 to the BumpCount Variable (because the Touch Sensor has been bumped)
- Drag and drop a red Variable block into the True case (tick)
- Set its mode to Read | Numeric
- Ensure the BumpCount variable is selected in the top right (it should be by default)
- Drag and drop a red Math block next to the read Variable block
- Wire the Value output from the read Variable block into the “a” input of the Math block
- Drag and drop a red Variable block next to the Match block
- Set its mode to Write | Numeric
- Ensure the BumpCount variable is selected in the top right (it should be by default)
- Wire the Result output from the Math block into the Write Variable block Value input
- Drag and drop a red Variable block into the True case (tick)
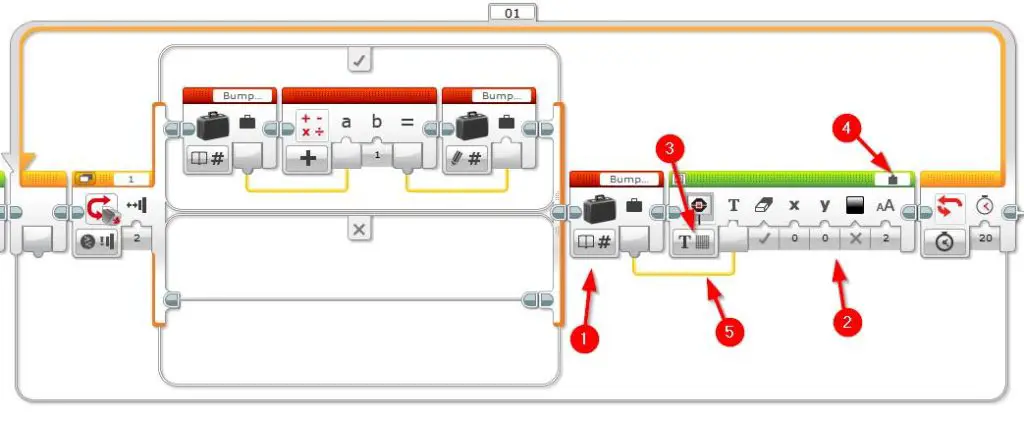
- Display the number of bumps (BumpCount Variable) on the EV3 Brick display
- Drag and drop a red Variable block to the right of and outside of the switch block
- Set its mode to Read | Numeric
- Ensure the BumpCount variable is selected in the top right (it should be by default)
- Drag and drop a green Display block next to the Read Variable block
- Set its mode to Text | Pixels
- Set its Text to Wired by clicking on the word MINDSTORMS in the top right of the block
- Wire the Value output of the Read Variable block to the Text input of the Display block.
- Drag and drop a red Variable block to the right of and outside of the switch block
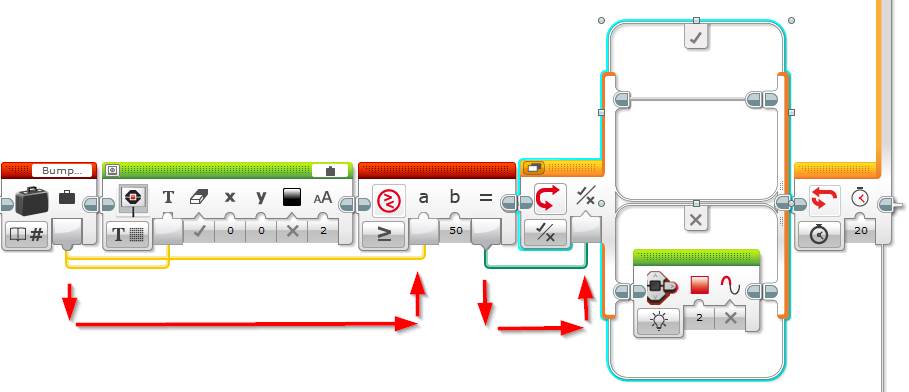
- Set the EV3 Birck lights to the color Red if the BumpCount variable is less than or equal to 50.
- Drag and drop a red Compare block next to the Display block (still within the loop)
- Set its mode to Greater Than or Equal To
- Set the B input to 50
- Wire the BumpCount read block into the A input of the Compare block.
- Drag and drop an orange Switch block next to the Compare block
- Set its mode to Logic
- Wire in the Result Output from the Compare block into the Logic input of the Switch block
- Drag and drop a green Brick Status Light block into the False condition of the Switch
- Set its mode to On
- Set the Color input to 2 (Red)
- Set the Pulse input to False
- Drag and drop a red Compare block next to the Display block (still within the loop)
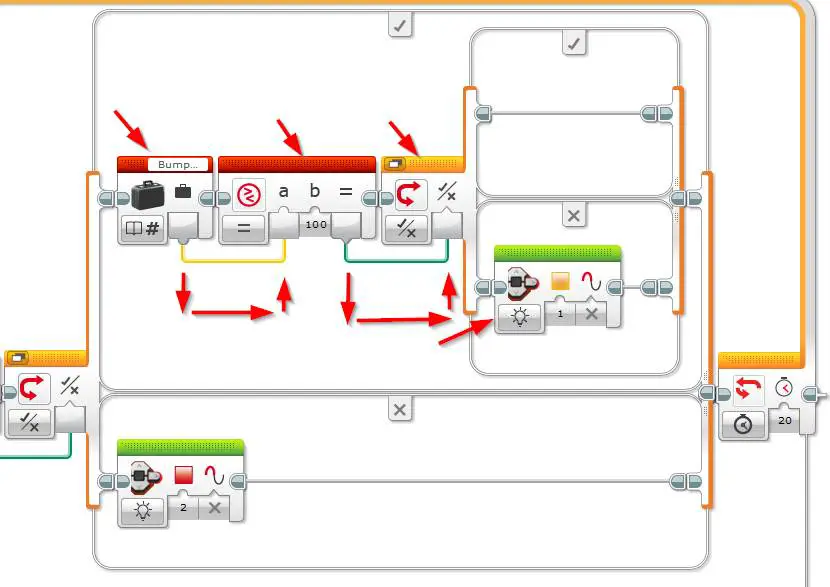
- Set the EV3 brick lights to orange if the BumpCount variable is between 51 and 100:
- Drag and drop a red Variable block within the True condition of the orange Switch block
- Set its mode to Read | Numeric
- Ensure the BumpCount variable is selected in the top right (it should be by default)
- Drag and drop a red Compare block next to the variable block
- Set its mode to Greater Than or Equal
- Set the B input to 100
- Wire in the Variable value output into the A input
- Drag and drop an orange Switch block next to the Compare block
- Set its mode to Logic
- Wire the Result output from the Compare to the Switch Logic input
- Drag and drop a green Brick Status Light block into the False condition of the switch
- Leave the Color as the default (orange)
- Set the Pulse input to False
- Drag and drop a red Variable block within the True condition of the orange Switch block
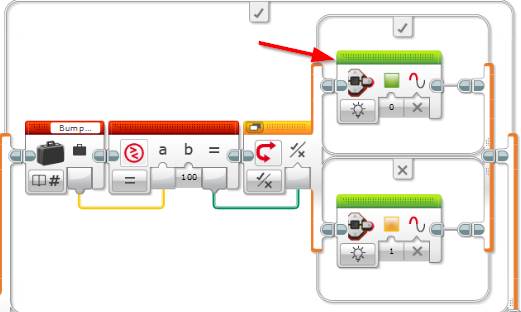
- Set the EV3 brick lights to green if the BumpCount variable is greater than 100:
- Drag and drop a green Brick Status Light block into the True condition of the switch
- Set the Color input to 0 (green)
- Set the Pulse input to False
- Drag and drop a green Brick Status Light block into the True condition of the switch
- Show the Total bump count on the EV3 Display for 5 seconds:
- Drag and drop an orange Wait block outside of the main loop
- Set the Seconds input to 5
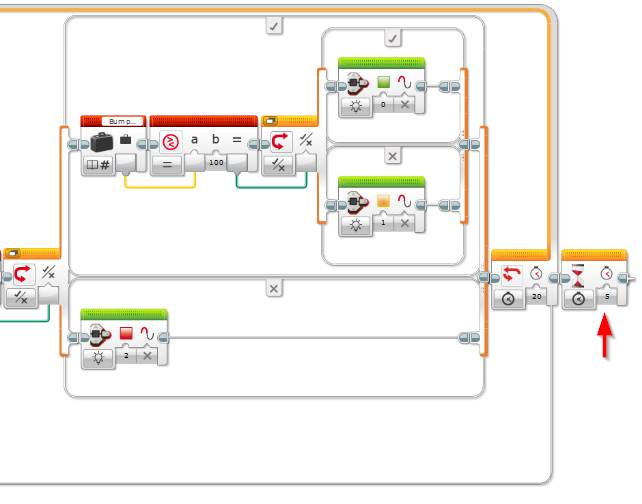
Congratulations you are done. Hit the Download and Run button to test the program. See if you can get over 100 bumps and turn the EV3 brick status lights green within 20 seconds.
Click the image below to see a full screenshot of the whole program:

Feel free to leave a comment if you get stuck or have any questions.

