The Loop block within the Lego MINDSTORMS EV3 Programming software (or app) is one of the most useful blocks a programmer can use. In this post we will delve into what it is, how it can be used along with loads of example programs to help understand the concepts covered.
What does the Loop Block Do?
The loop block is useful because it can be used to repeat programming logic until a certain condition is met, or repeat the logic infinitely if need be. The condition to break the loop could be a timer, or an input from a sensor (like a button press on the touch sensor or an object detected by the infrared / ultrasonic sensor).
What does the Loop Block Look Like?
The Loop block is available from the orange flow control palette:
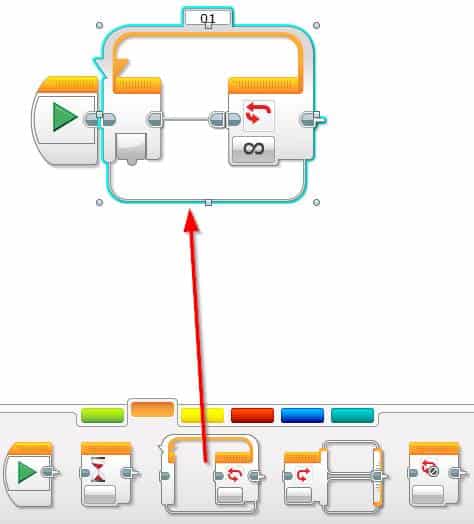
On its own the Loop block will not do anything, so like the Switch block we need to build our logic inside of the block, and in the case of the loop block – repeat the logic until a certain condition is met.
Loop Block Break Condition
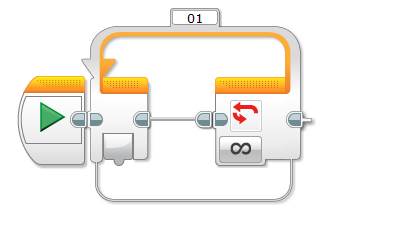
The break condition of the Loop block is the condition that needs to be met in order for the loop to end. The mode input on the Loop block is used to set the break condition and by default the mode is set to unlimited. Which means the loop block will not break (exit) and it will repeat its logic forever. When this mode is set any block to the right of the loop block will never be executed (unless we have a Loop Interrupt block, which is covered later in this post).
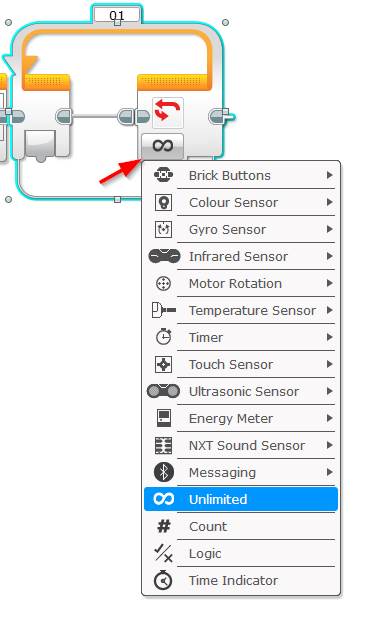
The break conditions (modes) can be broken down into the following 5 categories, and these are covered in more detail below.
Unlimited
As mentioned above, the unlimited Loop block mode will never exit the loop block so be careful when using this mode. This mode is typically used when you expect to manually end the program or using a loop interrupt block to exit the loop.
Count
Count Loop block mode will exit when a preset number of loops has been reached. The picture below shows a count mode set to 10 loops:
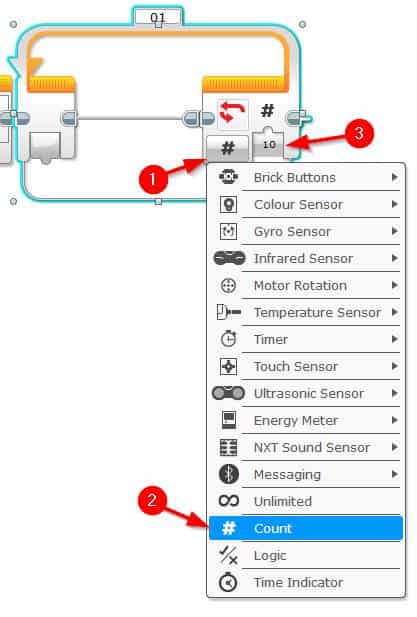
The count value does not need to be predefined before running the program, it could also be set via a variable at runtime. The program below will demonstrate how to do this:
Program logic:
- Create a new numeric variable named NoOfLoops
- Generate a random number and save it to the NoOfLoops variable
- Start a loop which will break on the NoOfLoops variable value
- Display a message to the screen “Number of loops: X” (x is the NoOfLoops variable).
- Set the loop count to the NoOfLoops variable and on each loop display the loop count to the screen
Lets get started:
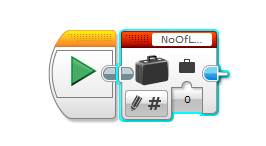
- Create the NoOfLoops Variable:
- Drag and drop a red Variable block next to the start block
- Click the Variable name and select Add Variable
- Type NoOfLoops in the new variable textbox and click Ok
- Note: by default the Variable block will be set to Numeric
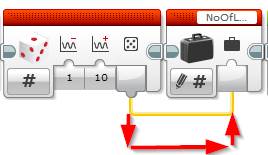
- Generate a Random number between 1 and 10
- Drag and drop a red Random block to the right of the Variable block
- Ensure its Lower Bound input is set to 1 and the Upper Bound input is set to 10.

- Save the Random number into the NoOfLoops Variable
- Drag and drop a red Variable block to the end of the EV3 program
- Ensure its mode is set to Write | Numeric
- Wire the value output from the Random block into the Variable block’s value input
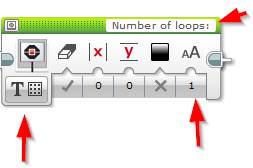
- Display the Text “Number of loops:” to the Lego EV3 Brick display
- Drag and drop a green Display block to the end of the program
- Change it’s mode to Text | Grid
- Set the Font Size input to 1
- Change the Text to: Number of loops:
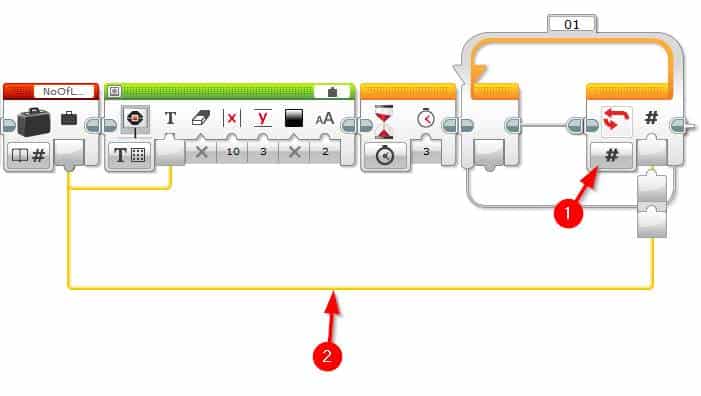
- Display the value of NoOfLoops variable on the screen along with the message from the previous step and add a wait for 3 seconds to give enough time to read it.
- Drag and drop a red Variable block to the end of the program
- Set its mode to Read | Numeric
- Drag and drop a green Display block to the end of the program
- Set its mode to Text | Grid
- Set the Clear Screen input to False
- Set the X input to 10 and the Y input to 3
- Change the Text input from MINDSTORMS to Wired
- Wire the Read Variable block into the Display block’s text input
- Drag and drop an orange Wait block to the right of the display block
- Set its seconds input to 3
- Drag and drop a red Variable block to the end of the program

- Add the Loop and set its count (i.e. the number of times it will repeat the logic) to the NoOfLoops variable
- Drag and drop an orange Loop block to the end of the program
- Set its mode to Count
- Wire the Variable block read from the previous step into the Loop’s count input
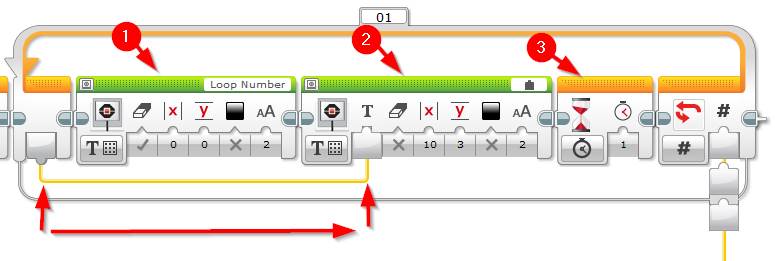
- Display the loop number on the EV3 Brick’s display using the loop index
- Drag and drop a green Display block inside the loop
- Set its mode to Text | Grid
- Set the text value to Loop Number
- Drag and drop another green Display block next to the one above still inside of the loop)
- Set its mode to Text | Grid
- Set Clear Screen to False
- Set X to 10 and Y to 3
- Set the Text to Wired
- Wire in the Loop Index from the left hand side of the loop into the Text input (see picture below for more details)
- Drag and drop an orange Timer block next to the display block
- Leave it at the default of 1 second – this should give enough time to read the loop count
- Drag and drop a green Display block inside the loop
The program is now finished! Hit the download and run button to try it out.
The loop count will always be one less than the generated random number. This is because the loop index value is zero based (it starts at 0 instead of 1).
Try using the red Math block to fix it.
Logic
A logic loop block mode uses a logic value to determine whether or not to break the loop. Once a logic (true / false) equals True, then the loop will stop.
The following program below is a good example of a logic loop. Like the previous program it will count the number of loops on the EV3 brick display and we will set a logic block to true once the count reaches six.
Program Logic:
- Create a new logic variable named BreakLoop (and set it to false)
- Start the loop which will exit when BreakLoop variable is True
- Print the loop index to the EV3 Brick display
- Check to see if the loop index is equal to six
- If it’s not set the BreakLoop variable to False
- If it is, set the BreakLoop variable to True
Now onto the program:
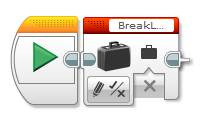
- Create a logic variable named BreakLoop
- Drag and drop a red Variable block next to the Start button
- Set its mode to Write | Logic
- Click the Variable name and select Add Variable
- Type BreakLoop in the new variable textbox and click Ok
- Add a logic Loop
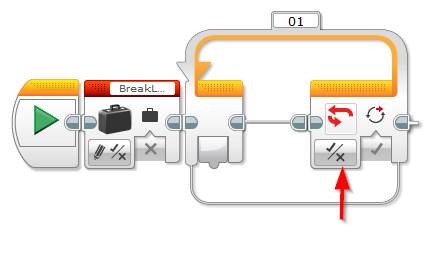
- Drag and drop an orange Loop block next to the Variable block
- Set its mode to Logic
- Show the index count on the EV3 Brick display
- Show the words “Loop Number:”
- Drag and drop a green Display block within the loop
- Set its mode to Text | Grid
- Set the text value to Loop Number
- Drag and drop a green Display block within the loop
- Display the loop index
- Drag and drop a green Display block within the loop
- Set its mode to Text | Grid
- Set clear screen to False
- Set X to 10 and Y to 3
- Set the text value to Wired
- Wire the Loop Index into the 2nd Display block
- Drag and drop a green Display block within the loop
- Pause the text long enough to read it
- Drag and drop an orange Wait block to the right of the last Display block
- Leave the default of 1 second
- Drag and drop an orange Wait block to the right of the last Display block
- Show the words “Loop Number:”

- Check the loop index and set the BreakLoop variable to True if it’s equal to six
- Drag and drop an orange Switch block to the right of the Wait block
- Set its mode to Numeric
- Wire the loop index into the Switch block’s number input
- Set the BreakLoop Variable to false if the loop index is less than 6
- Drag and drop a red Variable block into the Case section for 1
- Set its mode to Write | Logic
- Set the Value to False (it should be by default)
- Drag and drop a red Variable block into the Case section for 1
- Set the BreakLoop Variable to True if the loop index is 6
- Change the other Case section of the Switch block to 6
- Drag and drop a red Variable block into the Case (6) section
- Set its mode to Write | Logic
- Set the value to True
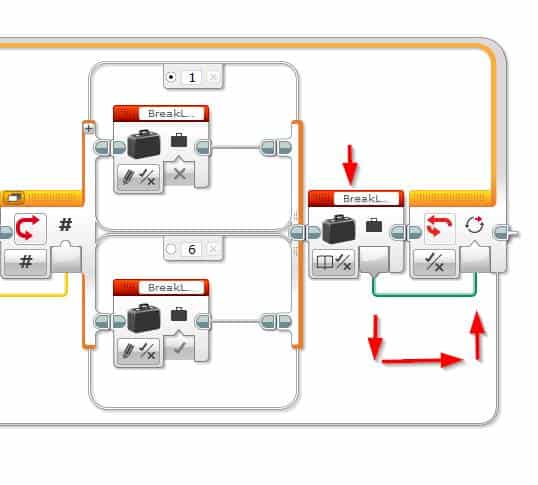
- Drag and drop an orange Switch block to the right of the Wait block
- Check the BreakLoop variable to see if the loop needs to stop
- Drag and drop a red Variable block to the right of the Switch block
- Set its mode to Read | Logic
- Wire the variable block into the Loop block’s Until True input.
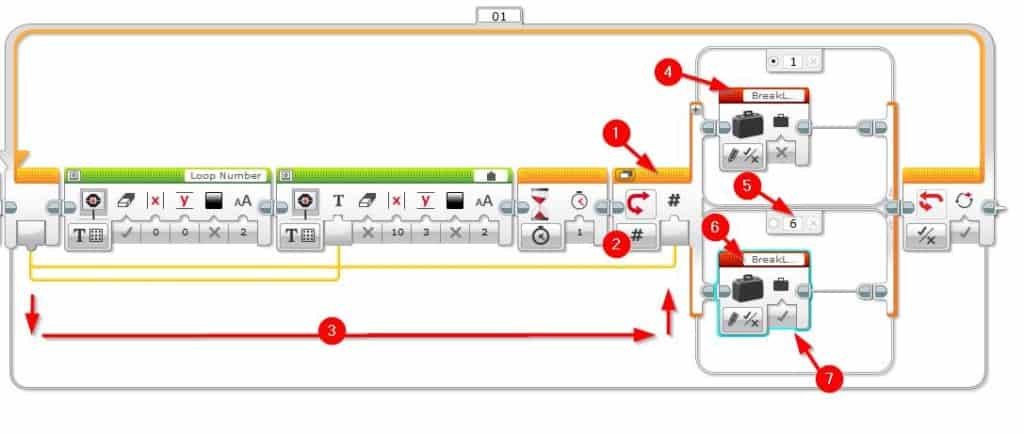
That’s the last step, the full program should look like the picture below (click to open full screen):

Note: Ensure the default case statement on the Switch block is the “1” by selecting its radio button as per the final picture above.
Time
The time loop block mode lets us exit the loop when the specified time is met. For example, a loop could be set to exit in 10 seconds.
The program below demonstrates how to use the Time mode on a Loop block. It’s a neat little game that will use the button sensor to count how many times you can press it in 10 seconds.
To create this program all you need is the Lego EV3 brick and the Touch sensor plugged into port number 1.
Program Logic:
- Set a loop timer for 10 seconds
- Each time the Touch sensor is tapped, add 1 to a NoOfBumps variable
- Display the NoOfBumps variable on the screen
Note that a more advanced version of this program can be found here##. Which can be used as a game.
Now onto the program:
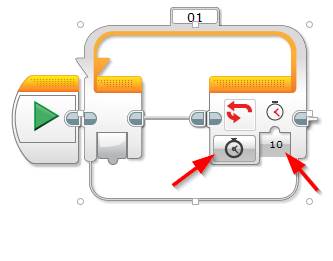
- Set a loop that will run for 10 seconds
- Drag and drop an orange Loop block next to the start block
- Set its mode to Time Indicator
- Set the seconds input to 10
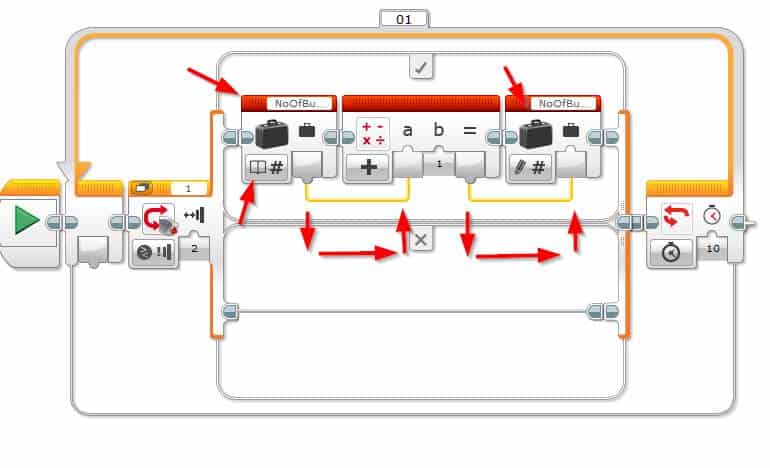
- Add 1 to a variable (NoOfBumps) each time the Touch sensor is pressed
- Check for a bump on the touch sensor
- Drag and drop an orange Switch block into the loop
- Set its mode to Touch Sensor | Compare | State
- Set the state input to 2
- Create the NoOfBumps variable
- Drag and drop a red Variable block into the True case statement of the switch block
- Set its mode to Read | Numeric
- Click the Variable name and select Add Variable
- Type NoOfBumps and click Ok
- Add 1 to the NoOfBumps variable
- Drag and drop a red Math block next to the variable block
- Wire the read Variable block into the A input of the Match block
- Drag and drop a red Variable block to the right of the Math block
- Ensure NoOfBumps is selected in the name
- Wire the = output of the Math block into the Variable block
- Drag and drop a red Math block next to the variable block
- Check for a bump on the touch sensor
- Read the NoOfBumps variable and show it on the EV3 display
- Read the variable
- Drag and drop a red Variable block after the Switch block (still inside the loop)
- Set its mode to Read | Numeric
- Ensure NoOfBumps is selected as the variable name
- Display “No of Bumps X” to the EV3 Brick’s display (where X is the number of bumps)
- Drag and drop a green Display block next to the read variable block
- Set its mode to Text | Grid
- Update X to 10 and Y to 3
- Change the text from MINDSTORMS to Wired
- Wire the Read Variable block into the Text input of the Display block
- Drag and drop a green Display block next to the Display block above
- Set its mode to Text | Grid
- Set Clear Screen input to False
- Change the text to No Of Bumps
- Drag and drop a green Display block next to the read variable block
- Add a timer to the end of the program so that the last number can be read
- Drag and drop an orange Timer block to the end of the program, outside of the loop
- Change its second input to 4
- Read the variable

Now the program is done, hit the Download and Run button to try it out. How many bumps can you get in 10 seconds?
Challenge: See if you can add an end message to give the final score.
Timer
There is one other way to use time with the Loop block, and that’s using the Timer | Time Indicator mode:
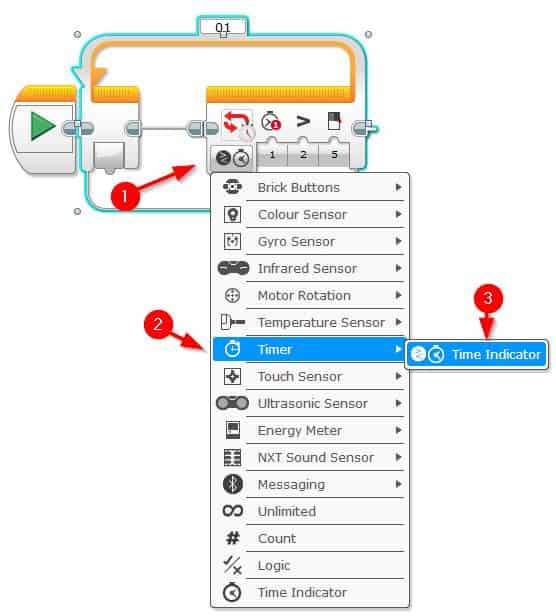
The Loop block timer mode allows us to compare one of the 8 built in timers against a threshold value and break the loop if the time is either:
- Equal to
- Not equal to
- Greater than
- Greater than or equal to
- Less than
- Less than or equal to
For example the following Loop block will exit if timer 1 is greater than 10 seconds.
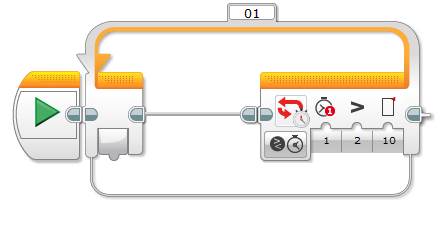
One thing to note is when using timer mode, you can control the timer’s time by using the yellow Timer control. From this control you can reset the timer giving us greater control over exactly when the program breaks the loop.
Sensor Modes
The sensor modes of the EV3 Programming Loop block will monitor a particular and break the loop when a certain condition with the sensor is met. The Loop block caters for the following EV3 and NXT sensors:
- Brick Buttons
- Color Sensor
- Gyro Sensor
- Infrared Sensor
- Motor Rotation
- Temperature Sensor
- Touch Sensor
- Ultrasonic Sensor
- Energy Meter
- NXT Sound Sensor
Note: if you are use the Home edition of the EV3 Programming software then some of these options are not available. Our post here goes over the differences between Home and Education software editions.
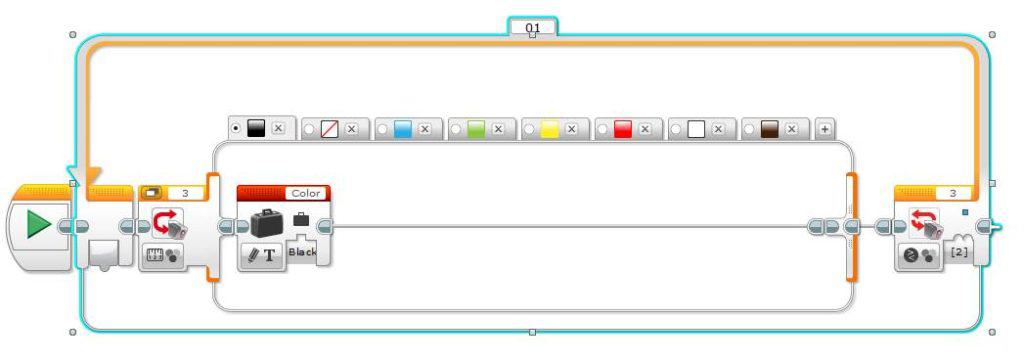
For our example Sensor mode loop block program we are going to use the Color sensor. The program will tell us the color it detects and it will break the loop when it detects the color blue.
All you need for this program is the Lego EV3 Brick and the Color sensor plugged into port 3.
Program Logic:
- Set a loop to break when the color sensor detects blue
- Using the Color sensor set a variable named Color with the name of the color it detects
- Show the color name on the EV3 display and pause for 1 second
- If the color is blue, break the loop and display “Loop ended” on the EV3 display
Now let’s get to the program:
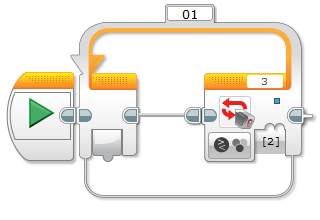
- Set up a loop to exit on blue being detected
- Drag and drop an orange Loop block next to the start block
- Set its mode to Color Sensor |Color
- Set “set of colors” input to 2 (blue) and uncheck the default (red – 5)
- Using the color sensor detect a color and write it to a variable named Color
- Drag and drop an orange Switch block inside the loop
- Set its mode to Color | Measure | Color
- Add a Case for each color (including none)
- I prefer to change the Switch’s view to a tab view by clicking the icon to the left of the port number. It makes it a lot easier to read when there’s a lot of options within the switch
- Drag and drop a red Variable block into each color Case within the Switch block
- In the first one create a Text variable named Color
- Set its mode to Write | Text
- Set the variable value input to each Color’s name.
- Drag and drop an orange Switch block inside the loop
- Display the detected color to the EV3 Brick’s display
- Drag and drop a green Display block after the Switch
- Set its mode to Text | Grid
- Change the text value to Color:
- Drag and drop a red Variable block next to the Display block
- Set its mode to Read | Text
- Ensure the variable name is Color
- Drag and drop another green Display block and place it next to the Variable block.
- Set its mode to Text | Grid
- Set Clear Screen to False
- Set X to 10 and Y to 3
- Set its text input to wired
- Wire the Variable block into the Display block’s Text input
- Drag and drop an orange Wait block next to the display block
- Leave its second input to 1 (this will display the message for 1 second – increase this as you see fit).
- Drag and drop a green Display block after the Switch

- Display the message “Loop Ended” when blue is detected and the loop exited:
- Drag and drop a green Display block outside of the Loop block
- Set its mode to Text | Grid
- Set the text to Loop Ended Blue Detected
- Drag and drop an orange Wait block next to the display block
- Set its seconds input to 2
- Drag and drop a green Display block outside of the Loop block

Now we are done – the complete program should look like this:

See if you can update the program to also exit on Red (or another color of your choice).
If you want to learn more about the Color sensor, click here to view our Color sensor in detail post.
Loop Interrupt
The last item related to the Loop block is the orange Loop Interrupt block:

The Loop Interrupt block is used to exit the loop prior to the break condition being met. This is particularly useful when the loop’s break condition is set to unlimited (infinite) and this could be used when checking for more than one break condition, and once either is detected the loop interrupt is used to break the loop.
We hope you have found this post helpful. If you have any questions or requests for a post, feel free to leave a comment below.

Comments
Thanks for the best Ev3 Tutorials on Google.
You’re welcome, thanks for the great feedback 🙂