The most basic thing we need to do with our Lego Mindstorms EV3 robot is to make it move. In this post I’ll take you through the moving basics outlined below:
- Move forwards
- Move Backwards
- Turning Basics
- Turn Right
- Turn Left
- Move Until Color
- Move Until Touch
- Move Until Object Detected
- Move Tank Vs Move Steering
To help you get started I’ve compiled all the example programs outlined within this post into a single Lego EV3 Programming Software Project which can be downloaded by clicking this link.
Getting Started
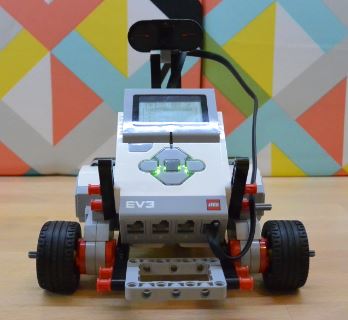
Before we delve into moving the robot, let’s start by building the same robot so that we will get the same results. The robot I chose is the Explor3r as it’s a quick and simple EV3 robot to build and it can be built using either the Education or Retail Lego Mindstorms EV3 kit. The build instructions from robotsquare.com can be found here.
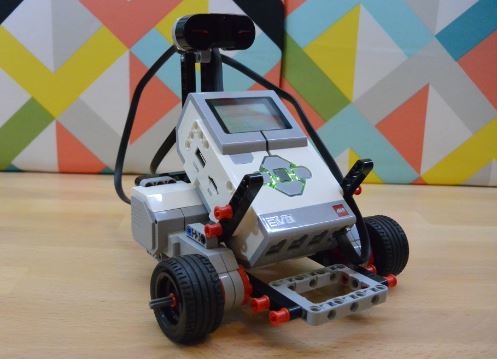
The Build should only take about 20 minutes for the base model. Don’t worry about adding the touch sensor or
Programming Options
Moving the EV3 robot can either be done with the Move Steering or Move Tank green programming blocks. The difference between the two is covered later in the article.
We’ll be using the Move Steering block within this article as it’s the easiest block to use for robots which use 2 large motors (where one controls the left side and the other controls the right). The Move Steering block is simpler as it will decide how to control both the motors at the same time depending on the turn or direction.
Move Steering Programming Block Basics
The Move Steering programming block can not only be used to move the robot in any direction, but it can also be used to make the EV3 robot stop. Here’s an explanation of the Move Steering programming block features:
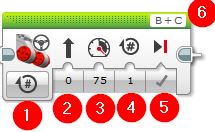
- Mode Selector
- Steering (direction)
- Power (Forwards or Backwards)
- Number of rotations or duration or degrees (depending on the mode)
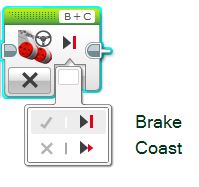
- Brake at End: Coast or Stop
- Port Selector (for the 2 large motors)
Move Steering: Mode Selector
There are 5 different modes to choose from within the Move Steering block, each are outlined below:
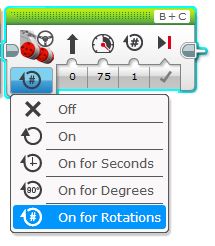
Off
Off mode will turn both motors off and therefore stop the robot. This is typically used in conjunction with On mode.
The only input available when the mode is set to Off is “Brake at End”. If the Brake at End input is set to coast then the robot will coast (roll) until it stops, if it’s set to brake then the robot will come to an immediate stop.
On
The On mode will turn both motors on and move to the next block in the program. The motors will run until they are stopped by using the Off mode.
When On mode is selected the Steering and Power inputs are the only available inputs.
On for Seconds
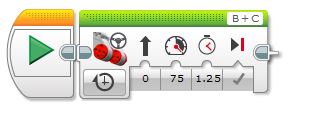
On for Seconds will turn both the motors on for the number of seconds set within the
When this mode is used, the following inputs are available: Power, Steering, Seconds, Brake at End.
Note that the number of seconds input supports up to 4 decimal places, so it can be used if a precise measurement of time is required. It can also be wired into the programming block if it needs to come from a variable.
The example below will move the robot forward for 1 and a quarter seconds with a power level of 75:
On for Degrees
On for degrees will turn both motors on and will wait for one of them to turn the number of degrees specified within the number of degrees input. 360 degrees of rotation is one full turn of the motor and the number of degrees is measured at the motor hubs.
This can be used to move or turn the robot a specific amount. The distance the robot will move can vary depending on the underlying gear ratios used on your specific robot i.e. wheel size, gearing, motor spacing etc.
The following inputs are used when On for degrees is selected: Power, Steering, Degrees, Brake at End.
Note that the degrees input will take a decimal point if an exact move is required.
The example below will move the robot backwards (note the power is a negative value) for 720 degrees i.e. 2 full rotations of the motors:
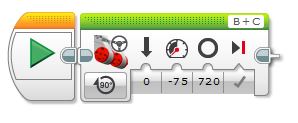
It’s also worth noting that if the robot is turning then one motor will be turning faster than the other. In this case the number of degrees is measured from the motor that turns fastest.
On for Rotations
On for rotations will turn both the motors on until one of them has turned the specified number of rotations and then it will turn them off. This can be used to move or turn the robot a specific amount.
One rotation equates to 360 degrees, and it’s really just the same as “On for Degrees” but it’s a different unit of measurement.
The following inputs are used when On for Rotations is selected: Power, Steering, Number of Rotations, Brake at End.
Note: The number of rotations input does accept up to 2 decimal places.
The example below will move the robot for 4.5 rotations forward with 100% power and then coast:
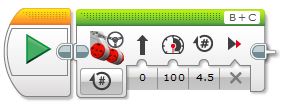
It’s also worth noting that if the robot is turning then one motor will be turning faster than the other. In this
Move Forwards
To move the robot forward, the power must be a positive number. A negative number will move it backwards and zero will not make it move at all.
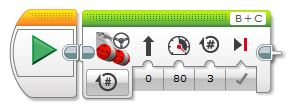
By default, the Move Steer block is set to move the robot forward in a straight line for 1 motor rotation. Let’s get started by simply moving the robot forward in a straight line for 3 rotations at 80% power:
- Open a new project.
- Drag the Move Steering block from the green palette up to the right of the Start block on the programming canvas:
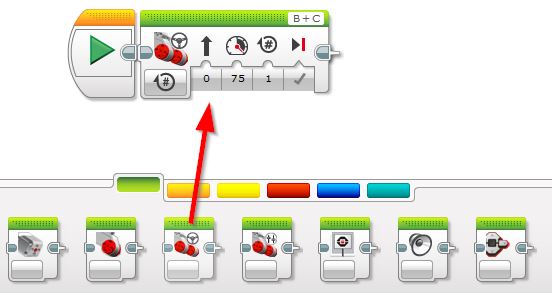
- Once the block is on the canvas update the Power value to 80 and the Number of Rotations to 3:
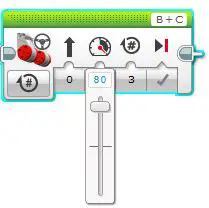
Note: You can update the power by either using the slider or typing the number 80 directly into the input value:
- Click the Download and Run button in the bottom right corner to send the program to your robot and test it out.
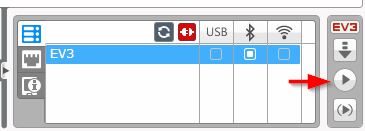
Congratulations! Your robot should have moved forward for roughly 40cm / 18 inches.
Move Backwards
Moving backwards is pretty much the same as moving forwards, however the Power input is a negative number.
Let’s give it a go by moving the robot back to the original starting position (that is if you have just completed the Move Forward instructions):
- Open a new project.
- Drag the Move Steering block from the green palette up to the right of the Start block on the programming canvas:

- Update the Power input to -80 and set the Number of Rotations to 3:
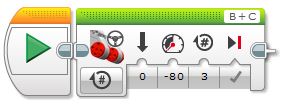
- Click the Download and Run button in the bottom right corner to send the program to your robot and test it out.

Turning Basics
Now that we have moving forwards and backwards in a straight line sorted, let’s start to turn the EV3 robot. Turning is done via the
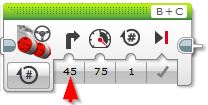
The steering input accepts numbers between -100 and 100 to control the direction:
- 0 = Straight ahead
- 1 to 100 = Turn Right
- -1 to -100 = Turn Left
The steering numbers may be entered directly into the block or set via by wire input from a variable or something else within your program. If this number is not zero (0), one of the motors will be slowed down in order to make the robot turn.
You may also notice that the arrow for the steering input will change to indicate the direction and type of turn as the number is updated. The closer the value gets to 100 or -100 the tighter the turn will be. Here are the turn ranges:
| Steer Input Value | Turn Type |
|---|---|
| 100 to 95 | |
| 94 to 63 | |
| 62 to 37 | |
| 36 to 6 | |
| 5 to 0 | |
| 0 to -5 | |
| -6 to -36 | |
| -37 to -62 | |
| -63 to -94 | |
| -95 to -100 |
If the number is close 100 or -100, the robot will turn on the spot and in this situation, one of the motors will be reversed in order to make the tight turn.
Turn Right
To turn the EV3 robot right a positive number must be entered into the steering input of the Move Steering block.
Let’s start by doing a gentle right turn:
- Open a new project.
- Drag the Move Steering block from the green palette up to the right of the Start block on the programming canvas.
- Set the Steering input to 6 and the number of rotations to 5:
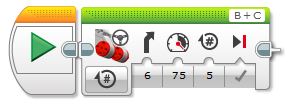
- Click the Download and Run button in the bottom hand corner to send the program to your robot and test it out.

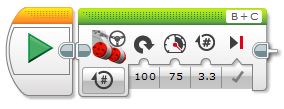
Next let’s try make the EV3 robot turn a full 360 degrees to the right on the spot:
- Open a new project.
- Drag the Move Steering block from the green palette up to the right of the Start block on the programming canvas.
- Set the Steering input to 100 and the number of rotations to 3.3. With a bit of
experimenting I found 3.3 rotations with the Explor3r robot was spot on for a full turn
- Click the Download and Run button in the bottom right corner to send the program to your robot and test it out.
Turn Left
To turn the EV3 robot left a negative number must be entered into the steering input of the Move Steering block.
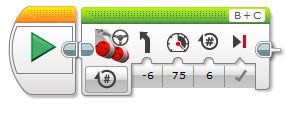
Let’s start by doing a gentle left turn:
- Open a new project.
- Drag the Move Steering block from the green palette up to the right of the Start block on the programming canvas.
- Set the Steering input to –6 and the number of rotations to 5:
- Click the Download and Run button in the bottom right hand corner to send the program to your robot and test it out.

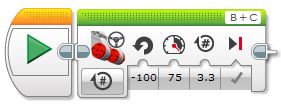
Next let’s try make the EV3 robot turn a full 360 degrees left on the spot:
- Open a new project.
- Drag the Move Steering block from the green palette up to the right of the Start block on the programming canvas.
- Set the Steering input to –100 and the number of rotations to 3.3. With a bit of experimenting, I found 3.3 rotations with the Explor3r robot was spot on for a full turn.
- Click the Download and Run button in the bottom right corner to send the program to your robot and test it out.
Move Until Color
If you have been following this post from the top and using the Explor3r robot, it’s now time to add the
If you are using your own robot, make sure you have the
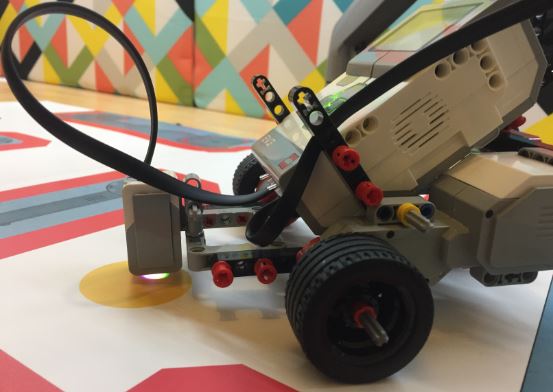
To move the EV3 robot until a particular

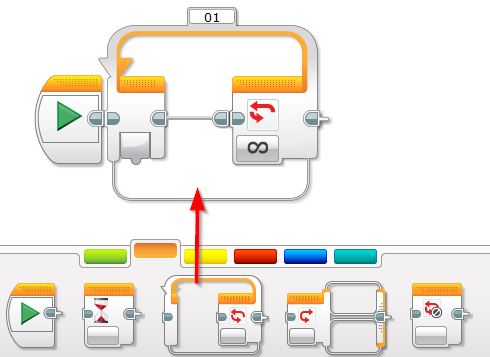
The loop block will continue to execute the code blocks we place in the middle until a condition is met. In this case, we’ll set it to use the
- Open a new project.
- Drag the Loop block from the orange palette up to the right of the Start block on the programming canvas:
- Drag a Move Steering block from the green palette into the middle Loop and set the mode to On, direction to 0 and power 75:
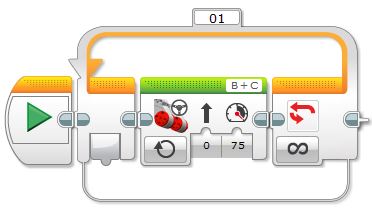
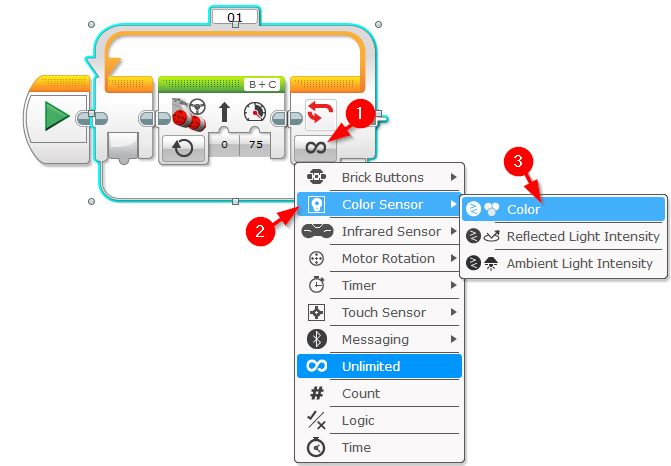
If the program was to be run at this stage it will loop forever and hence drive forward forever. The next step is to set the loop condition to check the
- Click the infinity symbol on the loop condition and select Color Sensor | Color:
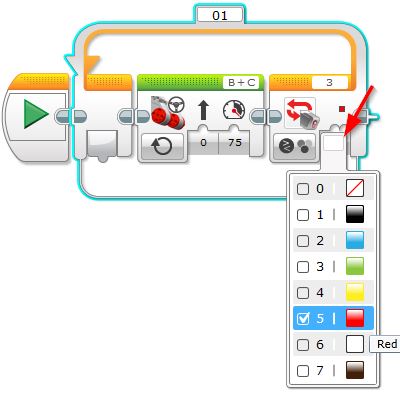
- Click the Color value on the loop and select the color you wish to detect. I’m going to use red.
- I’m going to stop the robot (not let it coast) so I’m adding another Move Steering block to the end of the program outside the loop, and I’ll set it’s mode to Off and Brake at End to True:
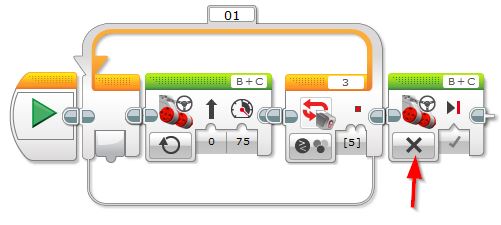
- Now it’s done! Place your robot on a course with your color in front somewhere. Click the Download and Run button in the bottom right corner to send the program to your robot and test it out.
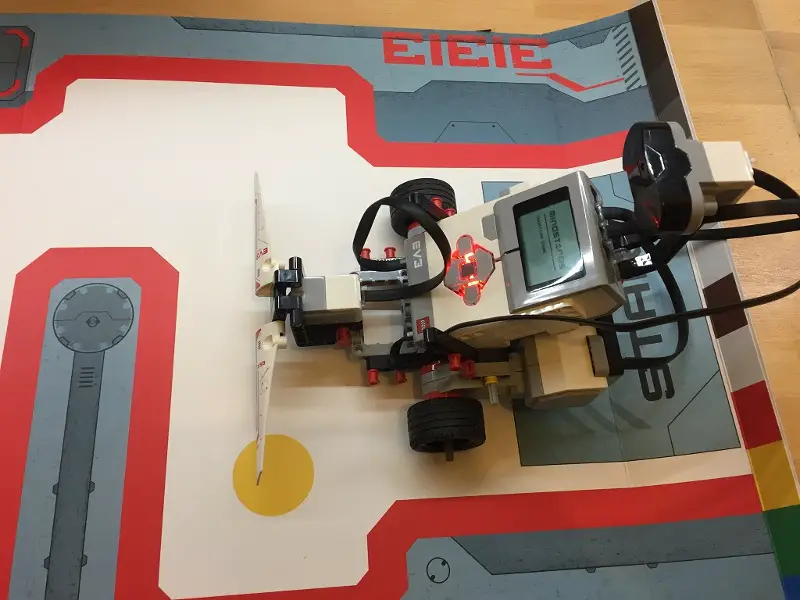
I used the map that came on the inside of the retail Mindstorms kit and had the V3 Robot move to the first red line it finds:
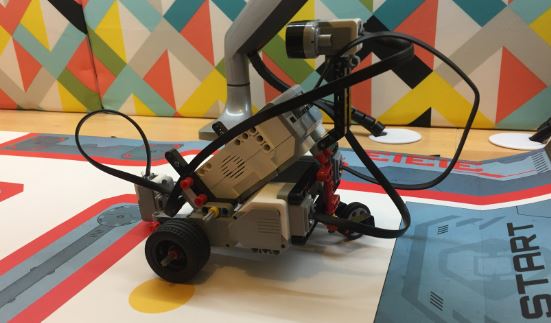
Tip: You can select more than one color on the loop condition which means the program can exit if any one of the selected colors is detected.
Move Until Touch
If you have been following this post from the top and using the Explor3r robot, it’s now time replace the
If you are using your own EV3 robot, make sure the touch sensor is on the front and facing forward and plugged into port number 1, similar to the Explor3r below:
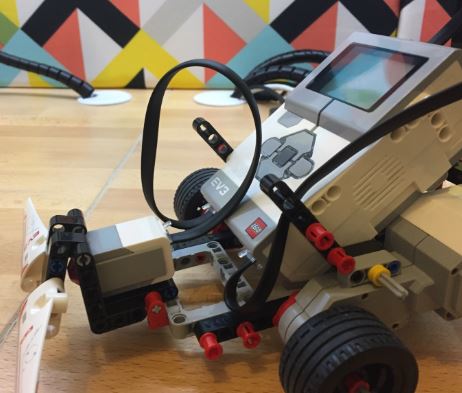
Just like all the “move until” type movements, to move the EV3 robot until it bumps something – we are going to use a loop block to keep the EV3 robot moving forward until the Touch Sensor’s state changes i.e. it’s pressed:
- Open a new project.
- Drag the Loop block from the orange palette up to the right of the Start block on the programming canvas:

- Drag a Move Steering block from the green palette into the middle Loop and set the mode to On, direction to 0 and power 75:

- Click the infinity symbol on the loop condition and select Touch Sensor | State:
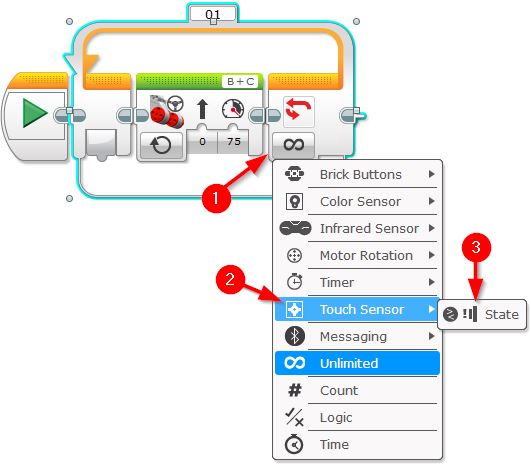
- Click the State input value on the loop and select the number 1 (Pressed)
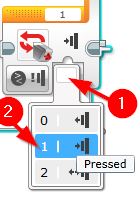
- Once the Touch Sensor is pressed I’m going to stop the robot (not let it coast) so I’m adding another Move Steering block to the end of the program outside the loop, and I’ll set it’s mode to Off and Brake at End to True:
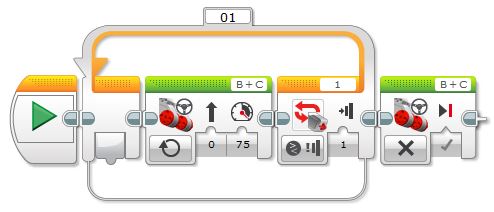
- Now it’s done! Place your robot on a course where it can hit something. Click the Download and Run button in the bottom right corner to send the program to your robot to test it out.
Move Until Object Detected
To a Lego EV3 robot move until an object is detected we are going to use the infrared sensor (if you have the retail kit) or the ultrasonic sensor (if you have the education kit). They will both achieve the same thing, they just do it using different technology.
- Open a new project.
- Drag the Loop block from the orange palette up to the right of the Start block on the programming canvas:

- Drag a Move Steering block from the green palette into the middle Loop and set the mode to On, direction to 0 and power 75:

The next step is to set the loop condition to check the infrared or ultrasonic sensor to see if an object is close:
- Click the infinity symbol on the loop condition and select Infrared | Proximity Or Ultrasonic Sensor | Distance in Centimeters:
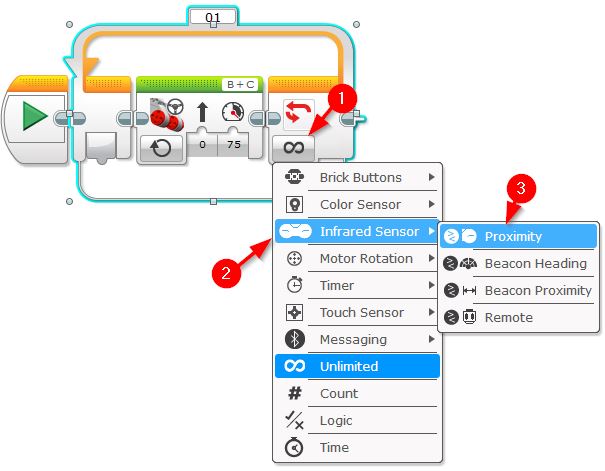
- On the Loop Block’s conditions set the Compare type to Less Than (4) and the Threshold Value to 30.
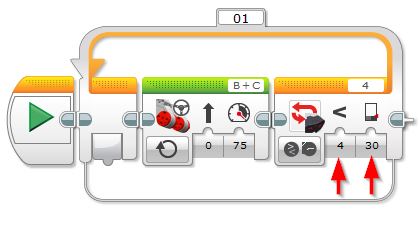
- I’m going to stop the robot (not let it coast) so I’m adding another Move Steering block to the end of the program outside the loop, and I’ll set it’s mode to Off and Brake at End to True:
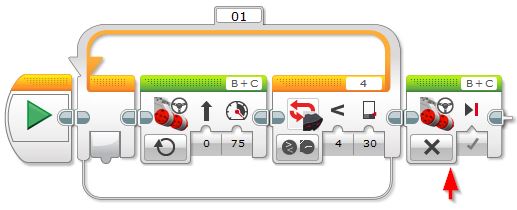
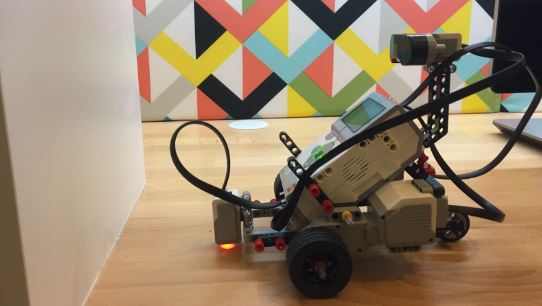
- Now it’s done! Place your robot some distance away from a wall / object and Click Download and Run
Have fun and experiment with the distances.
Move Tank Vs Move Steering
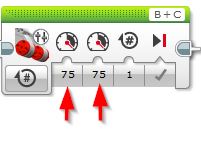
Even though the Move Tank and Move Steering blocks achieve similar actions, the difference between Move Tank and the Move Steering programming blocks is that the Move Tank block allows greater control of the direction and turn angle as it has inputs to control each motor individually. As per the image below the Move Tank block allows the left and right motor direction and power to be independently set:
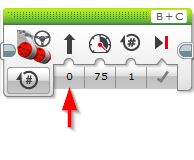
As you can see, the Move Steering block is definitely easier to use as it takes the complication out of steering. If it’s more control you’re after then the Move Tank block will do the job for you.
If you have any questions feel free to leave a comment below.

