In this post we will cover the My Block Builder function of the Lego MINDSTORMS programming software. We’ll include step by step example programs along the way to help you better understand this function of the software.
Before you start, please make sure you have the LEGO MINDSTORMS software installed and connected to your EV3 brick. For more detail on this, see our installation post here.
What is a My Block?
A My Block is a way to build your own blocks within the Lego MINDSTORMS EV3 programming software. It consists of one or more programming blocks and combines them into a single block which is available from the light blue My Blocks palette. My Block Builder can be used within the software to create a My Block.
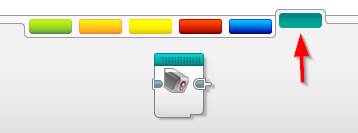
My Blocks are especially handy when you have a largely complicated program and you need to simplify the user interface to make it more readable (i.e. bringing multiple blocks into a single block). It’s also very useful when you have a bunch of common functions that can be simplified and reused within a single block in the programming software.
How to Create a Simple My Block
Creating a My Block is as simple as selecting the blocks you wish to use within the My Block and selecting My Block Builder from the tools menu.
The following example combines a 6 sound blocks that can be used for a countdown (5, 4, 3, 2, 1, Go!):
- Create the countdown:
- Drag and drop a green Sound block next to the start block
- Select the file Lego Sound Files | Numbers | Five
- Repeat this for the numbers four through to 1
- Drag and drop a green Sound block next to the last block (one)
- Select the file Lego Sound Files | Communication| Go
- Drag and drop a green Sound block next to the start block

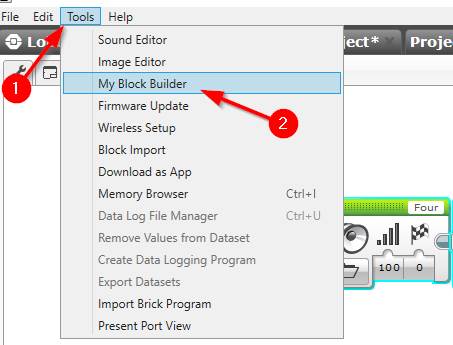
- Select all 5 blocks and from the Tools menu select My Block Builder
- Note: Make sure the Start Block is not selected, otherwise a error message will appear stating that the Start block cannot be included in a My Block
- Define the My Block a name
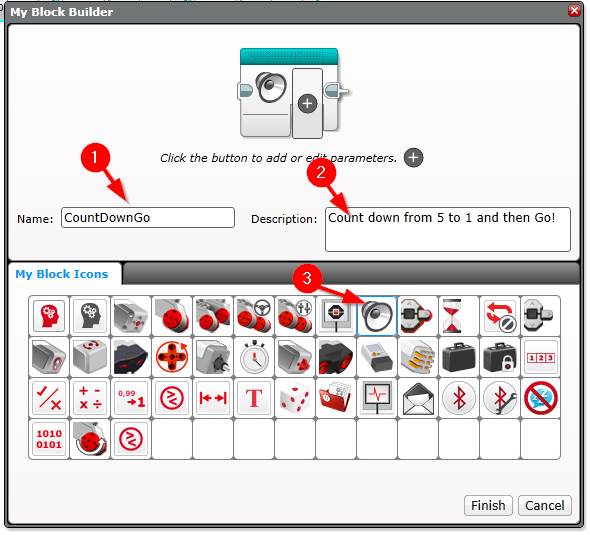
- Enter a name within the Name field. I’ll call this CountDownGo
- Note: the name cannot contain spaces, so it’s best to capitalize the first letter of each word if the name has more than one word – this makes it easier to read.
- Enter a description and select an Icon from the My Block Icons
- I’ll use the Sound icon for this example
- Enter a name within the Name field. I’ll call this CountDownGo
- Click Finish
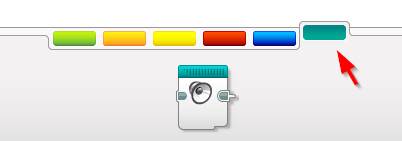
- From here, the My Block should be available from the light blue My Block palette.
How to Create a My Block with an Output Variable
Now we know how to create a simple My Block, lets create a My Block with an output variable that we can use within the main program. In the example below we will create a My Block that will use the Color sensor to save the name of the color it sensors into a text variable named Color. It will then output this text value. From there we will read the output variable into a variable within the main program and show it on the EV3 Brick’s display.
All that’s required to do this program is the Lego EV3 brick and the Color Sensor plugged into port 3.
Create the Color Reading My Block
First step is to create the color reading My Block:
- Create a new program
- Click the + tab to the right of the last program in your project
- Drag and drop an orange Switch block next to the Start block
- Set its mode to Color Sensor | Measure | Color
- Change the view to Tabbed view (I find it’s easier to read when dealing with a lot of case options)
- Add a Case option for each color (blue, green, yellow, red, white, brown)

- Setup a variable named Color to the color’s name within each case option.
- Drag and drop a red Variable block into the black case option
- Set its mode to Write | Text
- Add a variable named Color
- Type the word Black into the variable value
- Repeat this process for each case option replacing the color name with the appropriate color for the case. There’s also no need to create the variable either (since it already exists)
- Drag and drop a red Variable block into the black case option

- Create the My Block
- Select the Switch block (ensure not to select the start block otherwise the create will fail)
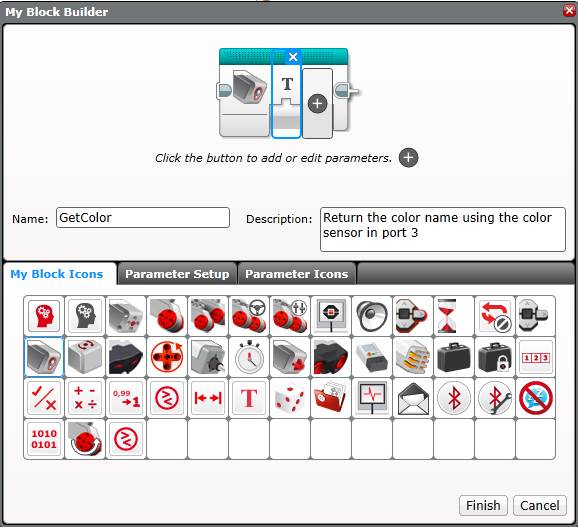
- Select Tools | My Block Builder and set:
- Name = GetColor
- Description = Return the color name using the color sensor in port 3
- Select an Icon
- Click the + button on the My Block Icon on the top of the window (an input named a should appear)
- Click the Parameter Setup tab and enter:
- Name = ColorName
- Parameter Type = Output
- Data Type = Text
- Click Parameter Icon tab
- Select an icon for the parameter
- Click Finish
- Set up the My Block output variable
- Drag and drop a read Variable block to the right of the Switch block
- Set its mode to Read | Text
- Drag the output variable over next to the variable block
- Wire the read Variable block into the Output variable
- Drag and drop a read Variable block to the right of the Switch block
Congratulations, you have setup a My Block with a output variable. Close the tab and create a new program where we will put the GetColor My Block to use.
Using a My Block with an Output Variable
Now we have created a My Block with an output variable in the previous step, lets use it within a program to show the detected color on the EV3 Brick’s display.
- Create a new program (within the same project as the previously created GetColor My Block).
- Drag and drop an orange loop block next to the Start block
- Set its mode to Time Indicator and the seconds value to 60
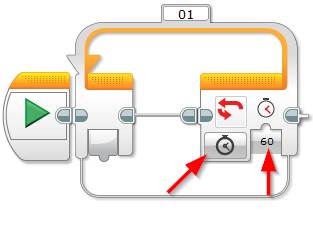
- From the light blue My Blocks palette, drag and drop the GetColor My Block inside the Loop.
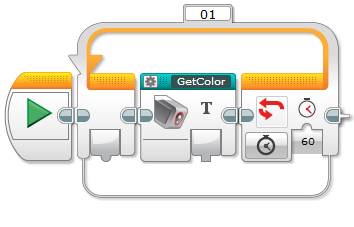
- Set the output variable into a program variable
- Drag and drop a red Variable block next to the GetColor block
- Set its mode to Write | Text
- Add a variable named Color
- Wire the output from the GetColor My Block into the variable
- Drag and drop a red Variable block next to the GetColor block
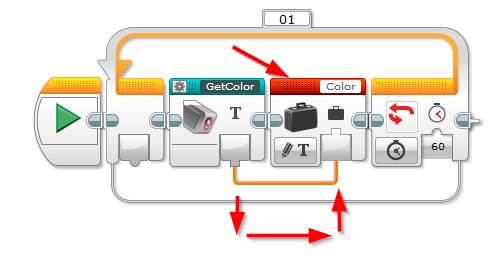
- Show the detected color on the EV3 Brick’s display
- Drag and drop a red Variable block next the variable block above
- Set its mode to Read | Text
- Drag and drop a green Display block next to the Variable block
- Set its mode to Text | Grid
- Change the text from MINDSTORMS to Wired
- Wire the read Variable block above into the Display block
- Drag and drop an orange Timer next to the Display block
- Set its seconds input to 2 (to display the color on the display for 2 seconds)
- Drag and drop a red Variable block next the variable block above
That’s it, the full program should look like the screenshot below:

Hit the download and play button to test out the program.
A shorter way to program this logic would be to remove both Variable blocks and wire the output from the My Block directly into the Display block. The variable blocks are handy only if you wanted to extend the program and use the output later in the logic.
How to Create a My Block with an Input and Output Variable
For the last example, lets create a My Block that has both an input and output variable. In this program we will pass a numeric value into a My Block which will multiply that value by 5 and output the result.
All you need to run this program is the Lego EV3 Brick (no sensors are required).
Create the Input / Output My Block
- Open a new program
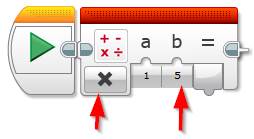
- Drag and drop a red Math block next to the start block
- Set its mode to Multiply
- Set the b input to 5
- Create the My Block
- Select the Math block
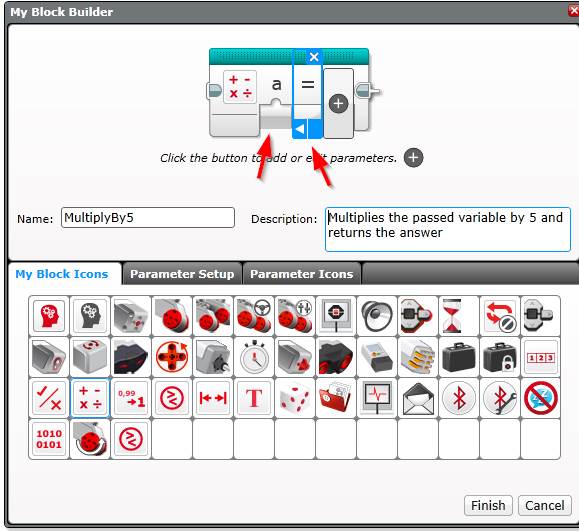
- Select Tools | My Block Builder and set:
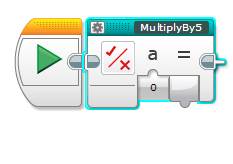
- Name = MultiplyBy5
- Description = Multiplies the passed variable by 5 and returns the answer
- Select an icon
- Click the + (Add Parameter) button on the top picture in My Block Builder
- Click Parameter Setup and set:
- Name: Number
- Direction: Input
- Data Type: Number
- Default Value: 0
- Click Parameter Setup and set:
- Click the + (Add Parameter) button again on the top picture in My Block Builder
- Click Parameter Setup and set:
- Name: Result
- Direction: Output
- Data Type: Number
- Click Parameter Icons:
- Select the = icon
- Click Parameter Setup and set:
- Click Finish
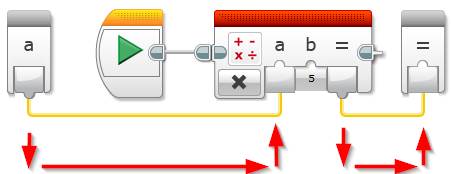
- Wire the input and output parameters:
- Wire the A (input) parameter into the a input on the Math block
- Wire the Result output from the Math block into the “=” output
Using a My Block with an Input and Output Variable
Now the MultiplyBy5 My Block has been created, lets us it in a program:
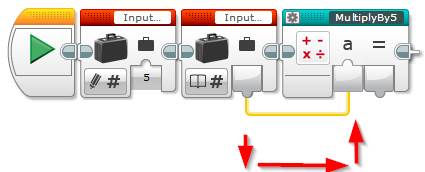
- Set up a new Variable and pass it into the MultiplyBy5 My Block
- Drag and drop a red Variable block next to the Start block
- Set the mode to Write | Numbric
- Create a new variable named InputNumber
- Set its Value to 5 (or any number you wish to multiply by 5)
- Drag and drop a red Variable block next to the block above
- Set its mode to Read | Numeric
- Drag and drop the MultiplyBy5 My block from the light blue palette
- Wire the read Variable block into My Block input
- Drag and drop a red Variable block next to the Start block
- Display the result on the EV3 Brick display
- Drag and drop a green Display block next to the My Block
- Set its mode to Text | Grid
- Change its text value from MINDSTORMS to Wired
- Wire the output of the My Block into the text input of the Display block
- Drag and drop an orange Wait block next to the Display block
- Set its seconds input to 5 (to display the output for 5 seconds)
- Drag and drop a green Display block next to the My Block
The final program should look like the picture below:

Hit the download and play button to test your program. Try changing the InputNumber value to test out the MultipleBy5 My Block.
How can I see what’s within a My Block?
To see what’s inside a My Block, drag it onto the programming canvas and double click the My Block to see what’s inside. A new tab should open showing the contents of the My Block.
How to Make Changes to an Existing My Block
To make changes to an existing My Block, drag and drop the My Block on to the programming canvas and double click the block to open it (as described in the previous section).
The contents of the My Block will open within a new tab, make the required changes within the tab and select File | Save Project.
Shortcut: Press CTRL + S to save the project.
How to Reuse an Existing My Block as a Base for a New My Block
If you have an existing My Block that you would like to reuse as a base for a new My Block, this is possible by copying and pasting the existing My Block into a new My Block:
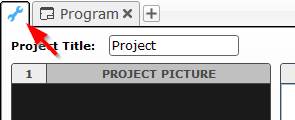
- Click the Project Properties tab
- Select the My Blocks tab
- Select the existing My Block you wish to copy and click the Copy button
- Click the Paste button and type in the name of the new My Block
How to Rename a My Block (or Change the Icon)
To rename or change the icon of a My Block simply move the block onto the programming canvas and click the Edit icon in the top left of the block. The My Block Builder window will open with the details of the My Block, and from there the name, description and icon can be changed.

Can I use a custom My Block in Multiple Projects?
Yes, My Blocks can be used within other Projects but they need to be exported to copy them over and they are not simply available across different projects once they are created. When a My Block is created it’s tied to the single project and can be used within multiple programs within that project. If you need more information on the project/ program structure, see the “Starting a New Project / Program” section within our post here.
The best way to move a custom My Block from one EV3 Software project to another is to export it from the project it was created in and import it into the destination project:
- Open the project file that contains the My Block you wish to use
- Click the Project properties tab
- Select the My Blocks tab

- Select one or more of the My Blocks you wish to copy to the new project and click Export. In the picture below I’ve select 2 (GetColor and MoveForwards):
- Select the appropriate folder for the export file, give it a name and click Save. I’ll call mine “ExampleExport”
- Open the project you wish to import the My Block(s) into and click its Project properties tab.
- Select the file created in step 5 and click Open

- Once the import is finished, click on the My Blocks tab and you should see you My Blocks within the new project.
Tip: A great way to organise your My Blocks is to keep a “My Blocks” project which contains all the useful My Blocks you have created, that way they are all in the one place. This project can then be used to export the My Blocks that you require for the new project.
An alternate way to copy a My Block from one project to another is to select the My Block within the project properties and use the copy button (instead of the Export), then on the destination project, click Paste from within its project properties.
How to Delete a My Block from a Project?
Deleting a custom My Block from the light blue My Block palette within the Lego MINDSTORMS programming software is not very intuitive, but is quite easy once you know where it is.
In the example below, I’ll show you how to delete a My Block named “Get Color” from a project:
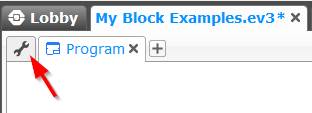
- From within the project select Project Properties
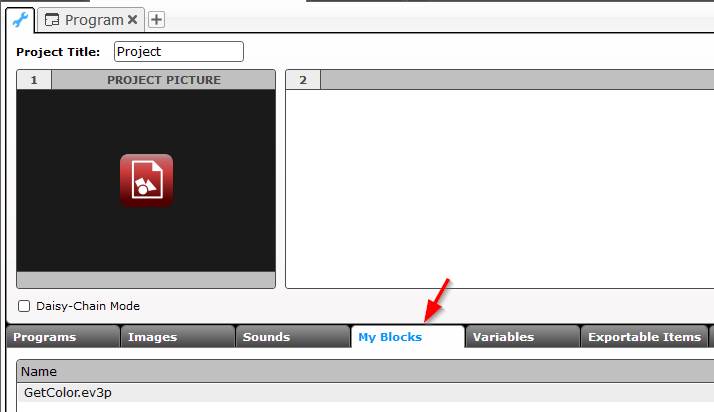
- Select My Blocks tab from the properties page
- Select the My Block you wish to delete and click the Delete button on the bottom of the tab
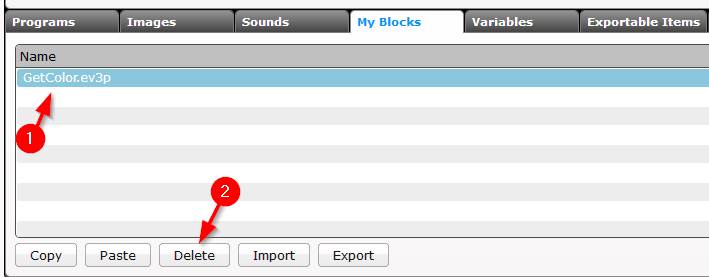
Warning, there’s no “Are you sure?” prompt for the delete so be sure you have the correct block selected before clicking the Delete button.
Feel free to leave a comment if you have any issues or questions.


Comments
Very nice post for a beginner like me
Thanks Joaquín,glad we could help.
Let us know of any other topics that would be helpful to you.